
Introduction
Sweet potato rolls are a delightful addition to any meal, combining the comforting essence of freshly baked bread with the unique sweetness and nutritional benefits of sweet potatoes. These rolls are not only indulgent but also versatile, making them perfect for a variety of occasions — from family dinners to festive gatherings and even casual brunches. The appeal of homemade bread lies in its aroma, warmth, and the satisfaction of crafting something delicious from scratch. Sweet potato rolls elevate this experience by offering a distinct flavor that pairs beautifully with numerous dishes, whether it’s a hearty stew or a light salad.
Incorporating sweet potatoes into bread is a trend that has been gaining popularity, thanks to their delightful taste and health advantages. Rich in vitamins and minerals, sweet potatoes provide a natural sweetness that can reduce the need for added sugars. This recipe offers a simple way to enjoy the benefits of sweet potatoes while indulging in the comforting experience of freshly baked rolls.
Understanding Sweet Potatoes
Before diving into the recipe, it’s essential to understand why sweet potatoes are an excellent choice for baking. Nutritionally, sweet potatoes are a powerhouse. They are an excellent source of beta-carotene, which the body converts into vitamin A, crucial for maintaining healthy vision and immune function. Additionally, sweet potatoes are high in fiber, promoting digestive health, and they offer a variety of antioxidants that help protect the body from free radical damage.
The natural sweetness of sweet potatoes enhances the flavor profile of bread, creating a delightful balance between rich, buttery dough and the sweet, earthy undertones of the potatoes. This combination not only makes for a delicious roll but also contributes to a soft, tender texture that is hard to resist. By using sweet potatoes in your rolls, you elevate the traditional bread experience to something truly special.
Ingredients Breakdown
To make these delectable sweet potato rolls, you’ll need a selection of simple ingredients. Here’s a detailed list with descriptions of each component and their contributions to the recipe:
– Sweet Potatoes: The star of the recipe! Sweet potatoes bring natural sweetness, moisture, and a hint of color to the rolls. Their creamy texture when mashed helps create a soft dough that rises beautifully.
– Butter: A key ingredient that adds richness and flavor to the rolls. It helps to create a tender crumb, making each roll melt in your mouth.
– Brown Sugar: This ingredient enhances the sweetness while also adding moisture to the dough. The molasses in brown sugar gives a subtle depth of flavor that complements the sweet potatoes perfectly.
– Yeast: Essential for bread-making, yeast is what allows the dough to rise and develop a light, airy texture. Using active dry yeast in this recipe provides that perfect lift.
– Flour: All-purpose flour serves as the foundation for the rolls, providing structure and support to the dough.
– Salt: A crucial player in baking, salt enhances the flavors of the other ingredients while also strengthening the dough.
– Optional Ingredients: For those looking to add more complexity to their sweet potato rolls, consider incorporating spices like cinnamon and nutmeg, or a drizzle of honey. These ingredients elevate the flavor profile, creating a warm and inviting aroma that fills your kitchen as they bake.
Step-by-Step Preparation
Preparing the Sweet Potatoes
The first step in making sweet potato rolls is preparing the sweet potatoes. Here’s how to do it:
1. Choosing the Right Sweet Potatoes: Start with medium-sized sweet potatoes, as they will provide the right amount for this recipe. Look for firm, unblemished potatoes for the best results.
2. Cooking the Sweet Potatoes: There are various methods to cook sweet potatoes, such as boiling, baking, or steaming. Baking is preferred for this recipe as it concentrates the sweetness and flavor. Preheat your oven to 400°F (200°C), and place the sweet potatoes on a baking sheet lined with foil. Bake for about 45 minutes to an hour, or until they are tender when pierced with a fork.
3. Mashing the Sweet Potatoes: Once the sweet potatoes are cool enough to handle, peel off the skin and place the flesh in a mixing bowl. Use a fork or potato masher to mash the sweet potatoes until smooth. You want a creamy consistency with no lumps for even distribution in the dough.
4. Tips for Achieving the Right Consistency: If your sweet potatoes are too thick or dry, consider adding a teaspoon or two of milk or melted butter to help achieve a creamy texture. Be cautious not to add too much liquid, as this can affect the overall consistency of your dough.
Activating the Yeast
Next, it’s time to activate the yeast, which is crucial for ensuring your rolls rise properly:
1. Choosing Your Yeast: Use active dry yeast for this recipe, as it is widely available and reliable. Check the expiration date on the package to ensure it is still active.
2. Activating the Yeast: In a small bowl, combine 1 packet (about 2¼ teaspoons) of active dry yeast with ¼ cup of warm water (between 100°F and 110°F). Add 1 tablespoon of sugar to the mixture and stir gently. Allow the yeast to sit for about 5 to 10 minutes until it becomes frothy. This indicates that the yeast is active and ready to use.
Mixing the Dough
With the sweet potatoes prepared and the yeast activated, it’s time to bring everything together:
1. Combine Ingredients: In a large mixing bowl, combine the mashed sweet potatoes, melted butter, brown sugar, activated yeast mixture, and salt. Stir until well combined.
2. Adding Flour: Gradually add in the all-purpose flour, one cup at a time, mixing until a soft dough forms. You may need about 3 to 4 cups of flour, depending on the moisture content of your sweet potatoes. The dough should be slightly sticky but manageable.
3. Kneading the Dough: Turn the dough out onto a floured surface and knead for about 8-10 minutes, adding flour as necessary to prevent sticking. The goal is to develop the gluten, which will give the rolls their structure and chewiness. Knead until the dough is smooth and elastic.
4. First Rise: Place the kneaded dough in a greased bowl, cover it with a clean kitchen towel, and let it rise in a warm, draft-free environment for about 1 to 1.5 hours, or until it has doubled in size. This is the time for the yeast to work its magic, creating air pockets that will make your rolls light and fluffy.
As you progress through these initial steps, the anticipation of the delightful aroma and taste of sweet potato rolls builds. The combination of nourishing ingredients and the loving process of baking creates an experience that will warm your heart and satisfy your taste buds. In the next part of this article, we will explore shaping the rolls, the second rise, and baking instructions, so stay tuned for the completion of this delicious recipe.
Importance of Mixing Techniques
When it comes to baking, the mixing techniques you employ can significantly impact the texture and flavor of your Sweet Potato Rolls. Proper mixing ensures the ingredients meld together seamlessly, creating a cohesive dough. Start by combining your wet ingredients—mashed sweet potatoes, melted butter, milk, and eggs—until smooth. Then, gradually incorporate the dry ingredients, which include flour, sugar, yeast, and a pinch of salt. Use a wooden spoon or a dough whisk for initial mixing; this gentle approach prevents the flour from being overworked, which can lead to tough rolls.
Incorporating the Flour
As you begin to add the flour to your wet mixture, do so in stages. This gradual addition allows you to monitor the dough’s consistency and prevent it from becoming too dry or overly sticky. Start with around half of your total flour and mix until just combined, then add more flour as needed. The sweet potato will add moisture, so finding the right balance is key. Aim for a dough that is soft and slightly tacky but not overly sticky to the touch.
Gradual Addition of Flour and Recognizing the Right Dough Texture
Recognizing the right dough texture is crucial for perfect rolls. After the initial mixing, you should have a dough that pulls away from the sides of the bowl but still clings slightly to your fingers. If your dough feels too wet, continue adding flour, one tablespoon at a time, until you achieve the desired consistency. Conversely, if it feels too dry, a splash of milk or water can help. Remember, under-mixing or over-mixing can both lead to undesirable results, so aim for a dough that’s smooth and elastic.
Kneading Tips to Achieve the Desired Consistency
Once your dough has come together, it’s time to knead. Kneading develops gluten, which is vital for the structure of your rolls. Turn your dough out onto a floured surface and begin kneading it by folding it over itself and pressing down with the palms of your hands. Rotate the dough a quarter turn and repeat this process. Knead for about 8-10 minutes, or until the dough is smooth and elastic. If the dough sticks to your hands or the surface, sprinkle a little more flour, but avoid adding too much, as this can lead to dense rolls.
The Rising Process
First Rise: Importance and What to Look For
The rising process is where the magic happens. After kneading, place your dough in a large, greased bowl and cover it with a clean kitchen towel or plastic wrap. This first rise, or bulk fermentation, is essential for developing flavor and texture. Allow the dough to rise in a warm, draft-free area for about 1-2 hours, or until it has doubled in size. To check if it’s ready, gently poke the dough with your finger; if the indentation remains, it’s time to move on to the next step.
Shaping the Rolls
Once your dough has risen, it’s time to shape the rolls. Gently punch down the dough to release excess air, then turn it out onto a floured surface. Divide the dough into equal portions; a kitchen scale can help achieve uniformity. For standard-sized rolls, aim for pieces weighing around 2 ounces each. Shape each piece into a ball by tucking the edges under and rolling it on the surface with your palm.
Techniques for Evenly Dividing and Shaping the Dough
For evenly divided rolls, you can use a bench scraper to cut the dough into portions. This tool is especially handy for maintaining clean edges and minimizing the amount of flour needed during shaping. After dividing, roll each piece into a ball, ensuring the tops are smooth. Place the shaped rolls on a greased or parchment-lined baking sheet, spacing them about an inch apart to allow for expansion during the second rise.
Overnight Method (Optional): Benefits of Prepping Ahead
If you want to save time on the day of baking, consider using the overnight method. After shaping the rolls, cover them tightly with plastic wrap and refrigerate overnight. This slow fermentation enhances the flavor and allows for a more complex taste. The next day, simply remove the rolls from the fridge and let them sit at room temperature for about 30 minutes before proceeding with the second rise.
How to Efficiently Manage Time When Baking
To manage your time effectively, plan your baking sessions. Prepare your sweet potatoes ahead of time by roasting or boiling them while you work on other meal prep. Additionally, having all your ingredients measured and ready before starting will streamline the process. If you’re using the overnight method, you can easily prepare the dough the night before and bake it in the morning, filling your home with the delightful aroma of fresh bread.
Second Rise: Ensuring Rolls are Fluffy and Light
After your rolls are shaped, they require a second rise, which is crucial for achieving light and fluffy rolls. Cover the rolls with a kitchen towel and let them rise for another 30-60 minutes, or until they’ve nearly doubled in size again. This step is vital as it allows the yeast to produce gas, which creates air pockets within the dough, resulting in a tender texture.
Baking the Sweet Potato Rolls
Preheating the Oven: Importance of Temperature in Baking
Before you bake, ensure your oven is preheated to 375°F (190°C). Preheating is essential as it creates the right environment for the rolls to rise and bake evenly. An oven thermometer can help ensure accuracy, as even a slight deviation in temperature can affect the outcome of your baked goods.
Baking Instructions
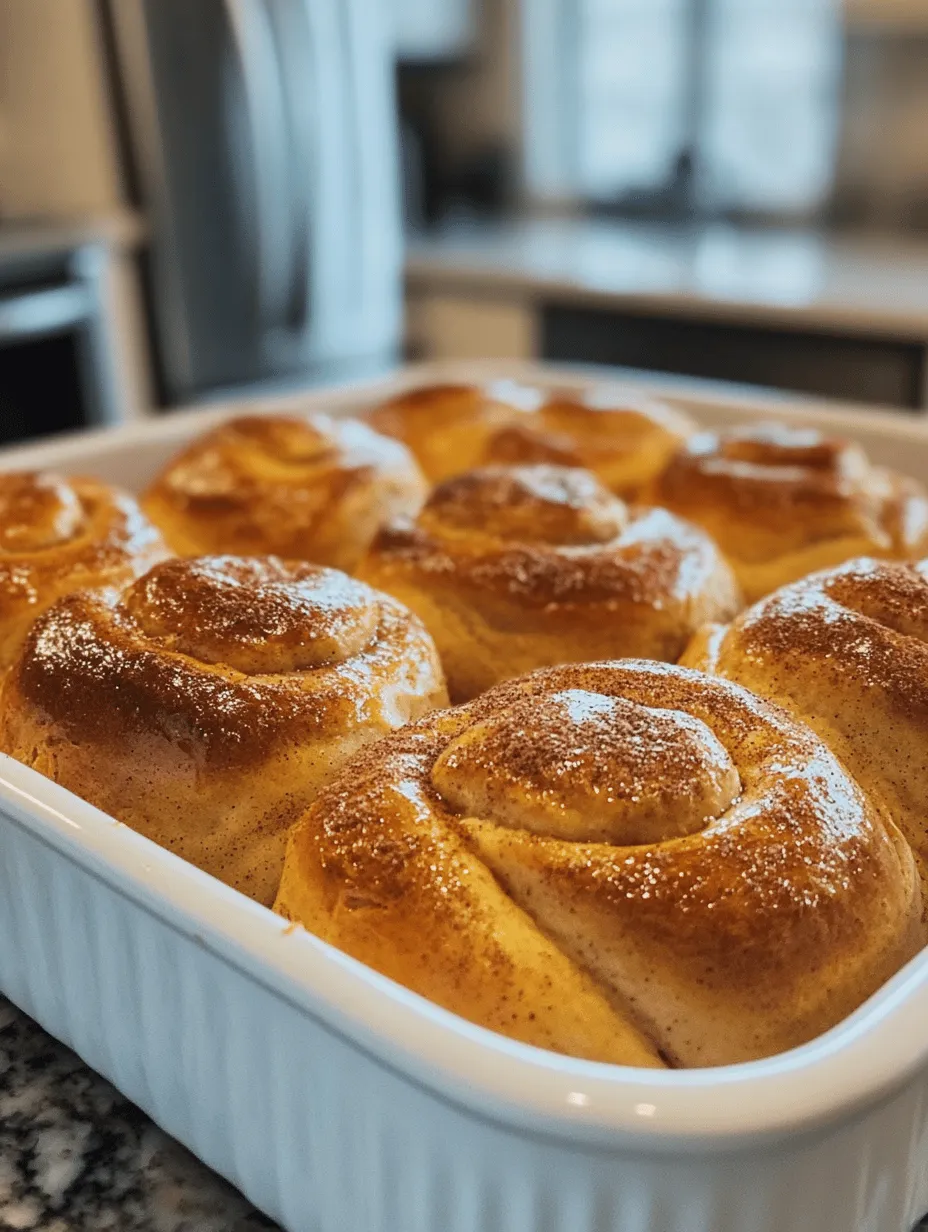
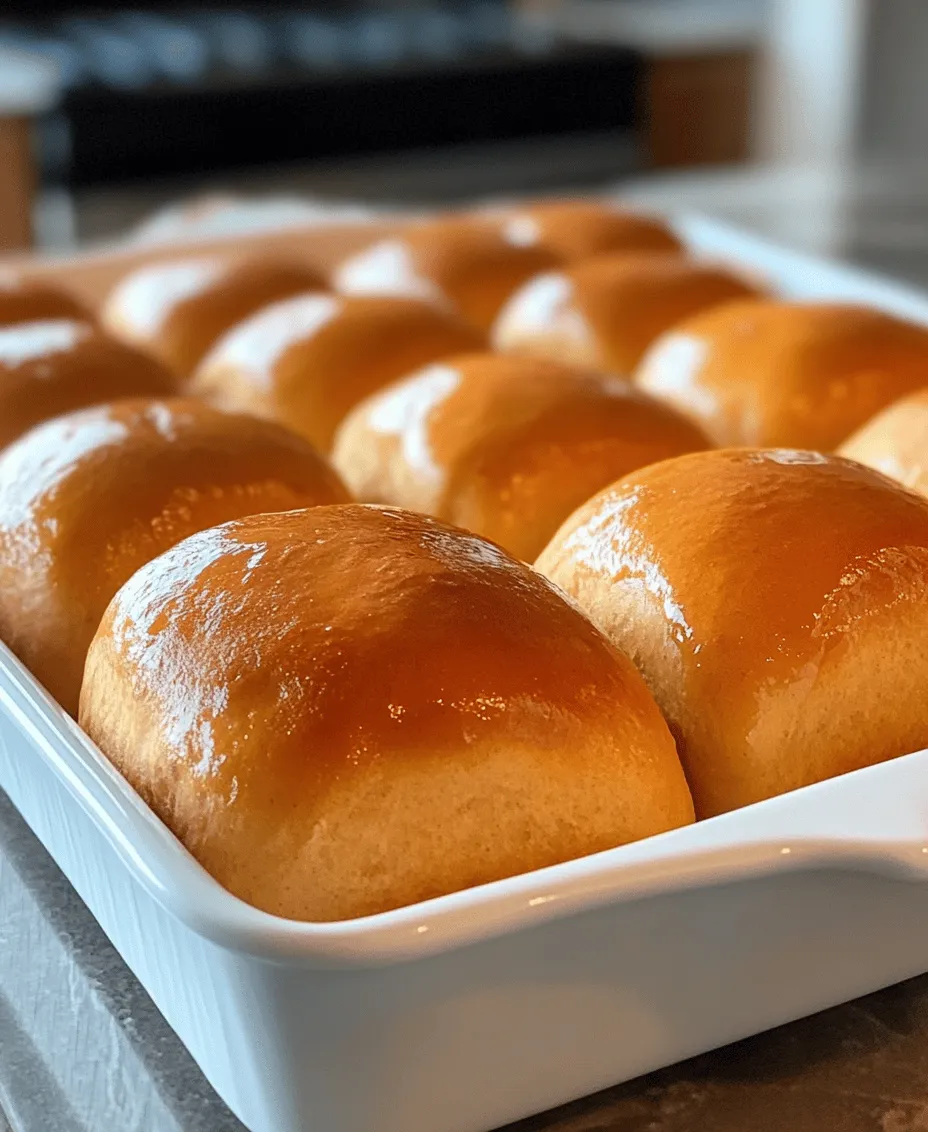
Once your rolls have completed their second rise, it’s time to bake. Brush the tops of the rolls with an egg wash (a mixture of beaten egg and a splash of water) to achieve a beautiful golden color. Place the baking sheet in the preheated oven and bake for about 18-20 minutes.
Timing and Visual Cues for Doneness
To determine if your rolls are done, look for a deep golden-brown color on top. They should also sound hollow when tapped on the bottom. If you have a kitchen thermometer, the internal temperature of the rolls should reach around 190°F (88°C) for optimal doneness.
The Role of the Egg Wash in Achieving Golden Tops
The egg wash not only adds a beautiful sheen to the rolls but also contributes to the appealing color and texture. It helps create a slightly crisp outer crust while maintaining the softness inside. For a vegan alternative, you can brush the rolls with a mixture of almond milk and maple syrup for a similar effect.
Cooling and Serving Suggestions
Proper Cooling Techniques to Maintain Texture
After baking, transfer your Sweet Potato Rolls to a wire rack to cool. This prevents moisture from accumulating at the bottom, which can lead to sogginess. Allow the rolls to cool for at least 10-15 minutes before serving. This cooling period allows the structure of the bread to set, making them easier to slice and enjoy.
Serving Ideas: Pairing with Spreads, Soups, or as a Side Dish
These Sweet Potato Rolls are incredibly versatile. Serve them warm with a pat of butter or a drizzle of honey for a delightful treat. They pair beautifully with soups, stews, or salads, making them an excellent addition to any meal. You can also use them as a base for sliders or sandwiches, filled with your favorite ingredients.
Variations to Consider (Herbs, Cheeses, etc.)
Feel free to get creative with variations on this recipe. Add herbs like rosemary or thyme to the dough for an aromatic twist. Cheese lovers can incorporate shredded cheddar or feta for a savory flavor profile. For a hint of sweetness, mix in dried cranberries or walnuts. The possibilities are endless!
Conclusion
Making Sweet Potato Rolls at home is not just about the delicious end product; it’s about the entire process—the mixing, kneading, and rising—that brings joy to the kitchen. Each step contributes to the warm, inviting aroma that fills your home as they bake. As you gather around the table with family and friends, there’s a unique satisfaction in sharing homemade bread, a symbol of comfort and togetherness. Embrace the journey of baking, experiment with flavors, and relish in the delightful taste of your Sweet Potato Rolls. Enjoy the warmth and satisfaction that comes from creating something special from scratch, and don’t forget to share the results with those you love. Happy baking!