
Introduction
Valentine’s Day is a special occasion dedicated to celebrating love and affection, and what better way to express your feelings than with homemade treats? There’s something uniquely intimate and heartfelt about crafting delicious goodies in your own kitchen. This year, why not surprise your loved ones with a batch of delightful homemade doughnuts? Not only are they a sweet indulgence, but they also show that you’ve put thought and effort into creating something special for the people you care about.
These homemade Valentine doughnuts are soft, fluffy, and incredibly easy to make. They serve as the perfect canvas for your creativity, allowing you to customize them with various glazes, toppings, and fillings that reflect the spirit of the day. Whether you’re celebrating with a partner, family, or friends, these doughnuts will surely bring smiles and joy to the occasion. Their tender texture and delightful sweetness make them an irresistible treat that will have everyone reaching for just one more.
As we dive deeper into this recipe, you’ll discover how simple it is to create these charming doughnuts right at home. With just a few key ingredients and a little bit of time, you can whip up a batch that is not only delicious but also visually appealing, making them a perfect centerpiece for your Valentine’s Day celebration.
Understanding the Ingredients
To achieve the perfect batch of soft and fluffy doughnuts, it is essential to understand the roles of each ingredient involved in the recipe. Here’s a closer look at the key components that come together to create these delightful treats:
– All-Purpose Flour: This is the foundation for our doughnuts. All-purpose flour provides structure and stability, ensuring that the doughnuts rise beautifully and maintain their shape as they cook. The protein content in the flour is crucial for gluten development, which gives the doughnuts their characteristic chewy texture.
– Granulated Sugar: Sweetness is a crucial aspect of any dessert, and granulated sugar enhances the flavor of our doughnuts while also contributing to their texture. Sugar helps create a golden-brown crust during frying and adds moisture to the batter.
– Instant Yeast: The secret ingredient that gives our doughnuts their light and fluffy texture is instant yeast. It allows for a quicker rise compared to traditional yeast, which makes the process of making doughnuts much more convenient. The yeast ferments, producing carbon dioxide that causes the dough to expand.
– Whole Milk: Whole milk adds richness and moisture to the dough, creating a soft texture. The fat content in whole milk contributes to the overall flavor and helps keep the doughnuts tender.
– Unsalted Butter: Butter not only imparts a rich flavor but also enhances the tenderness of the doughnuts. Using unsalted butter allows you to control the saltiness of the recipe, ensuring a perfect balance of flavors.
– Eggs: Eggs are essential for binding the ingredients together and enriching the dough. They help provide structure and moisture, resulting in a more tender and flavorful final product.
– Vanilla Extract: A must-have for flavor enhancement, vanilla extract elevates the taste of the doughnuts. Its aromatic profile complements the sweetness of the sugar, creating a delightful flavor combination.
– Ground Nutmeg: Although optional, ground nutmeg adds warmth and depth to the doughnut flavor. This subtle spice can enhance the overall taste, making the doughnuts even more enjoyable.
Step-by-Step Guide to Making Homemade Valentine Doughnuts
Now that we’ve covered the essential ingredients, let’s dive into the step-by-step guide for making your very own homemade Valentine doughnuts. Follow these instructions carefully for a successful and delicious outcome.
Activating the Yeast
The first step in our doughnut-making journey is activating the yeast. This process is critical for ensuring that your dough rises properly, resulting in light and fluffy doughnuts.
1. Warm Milk and Sugar Mixture: Begin by heating your whole milk until it is warm to the touch, around 110°F (43°C). You can do this on the stovetop or in the microwave. Once warmed, add a couple of teaspoons of granulated sugar to the milk and stir until dissolved. The warmth of the milk combined with the sugar provides an ideal environment for the yeast to thrive.
2. Adding Yeast: Sprinkle your instant yeast over the warm milk and sugar mixture. Let it sit undisturbed for 5-10 minutes. During this time, you should notice the mixture beginning to froth and bubble. This is a sign that the yeast is active and ready for use.
3. Signs That the Yeast is Ready: Once the mixture is frothy, it’s a clear indication that your yeast is alive and kicking. If you don’t see this reaction, it’s best to start over with new yeast, as inactive yeast can lead to dense doughnuts.
Mixing the Ingredients
With the yeast activated, it’s time to combine the wet and dry components to create a smooth batter.
1. Combining Wet and Dry Components: In a large mixing bowl, combine your all-purpose flour, granulated sugar, and ground nutmeg (if using). Make a well in the center of the dry ingredients and pour in the activated yeast mixture, along with the melted unsalted butter, eggs, and vanilla extract.
2. Stirring to Combine: Using a wooden spoon or a spatula, gently stir the mixture until it begins to come together. Be sure not to overmix at this stage; the goal is to combine the ingredients until there are no dry pockets of flour left.
3. Tips for Achieving the Right Dough Consistency: The dough should be slightly sticky but not overly wet. If it seems too dry, add a tablespoon of warm milk at a time until you reach the desired consistency. Conversely, if the dough is too sticky, sprinkle in a bit more flour until it becomes manageable.
Kneading the Dough
Once your dough is mixed, it’s time to knead it, which plays a crucial role in developing gluten and ensuring a light texture in the final product.
1. Explanation of the Kneading Process: Turn your dough out onto a lightly floured surface. With clean hands, begin to knead the dough by folding it in half and pushing it down with the heel of your hand. Rotate the dough a quarter turn and repeat this process for about 5-7 minutes.
2. How to Tell When the Dough is Ready: The dough is ready when it becomes smooth and elastic. You can perform the “windowpane test” by taking a small piece of dough and stretching it gently. If it stretches without tearing and allows light to pass through, it’s a good indicator that the gluten has developed sufficiently.
Rising the Dough
After kneading, it’s time to let the dough rise, allowing the yeast to work its magic.
1. First Rise: Place the kneaded dough into a lightly greased bowl, covering it with a clean kitchen towel or plastic wrap. This will help retain moisture and warmth, facilitating the yeast’s activity. Let the dough rise in a warm, draft-free area for about 1 to 1.5 hours, or until it has doubled in size.
2. Checking the Dough: After the rising period, gently poke the dough with your finger. If it springs back slowly, it’s ready for the next step. If it springs back quickly, it may need a little more time to rise.
As we proceed to the next parts of the article, we will explore how to shape the doughnuts, fry them to perfection, and make delightful glazes and toppings that will make your homemade Valentine doughnuts irresistible. Stay tuned for more tips and tricks to ensure your doughnut-making experience is both enjoyable and successful!

Homemade Valentine Doughnuts – Soft, Fluffy & Easy Recipe
Importance of a Warm Environment for Yeast Fermentation
Creating the perfect environment for yeast fermentation is crucial when making doughnuts. Yeast is a living organism that thrives in warm, moist conditions. Ideally, the temperature should be between 75°F to 80°F (24°C to 27°C) for optimal fermentation. If your kitchen is on the cooler side, you can create a warm spot by preheating your oven to its lowest setting for a few minutes, then turning it off. Place your dough in a bowl covered with a damp cloth inside the oven. This controlled warmth encourages the yeast to activate, resulting in a light, airy dough.
What to Look for During the First Rise
During the first rise, also known as fermentation, it’s important to observe the dough for specific indicators. After mixing and kneading, place the dough in a greased bowl, cover it, and let it rise until doubled in size. This can take about 1 to 2 hours, depending on the temperature of your environment. A well-risen dough will appear puffy and may have bubbles forming on the surface. Gently pressing the dough with your finger should leave an indentation that does not spring back immediately, indicating that the yeast has done its job effectively.
Shaping the Doughnuts
Once your dough has risen sufficiently, it’s time to shape the doughnuts. Start by gently punching down the dough to release excess air. Then, turn it out onto a floured surface. Using a rolling pin, roll the dough to about ½ inch thick. This thickness is key; too thin, and you risk overcooking the doughnuts, leading to a hard texture, while too thick may result in an undercooked center.
To cut the doughnuts, you will need a round cutter, ideally 2 to 3 inches in diameter, for the main shape. For the holes, a smaller cutter or the end of a piping bag will work perfectly. Dip the cutters in flour between cuts to prevent sticking. After cutting the doughnuts, place them on a parchment-lined baking sheet. Gather any scraps, re-knead gently, and roll out again to cut more doughnuts.
Techniques for Rolling and Cutting Dough
When rolling out your dough, ensure an even thickness for uniform cooking. Use a light hand and avoid excessive flour, which can dry out the dough. If the dough feels sticky, dust only the rolling pin and surface lightly with flour. When cutting, press straight down without twisting, as twisting can seal the edges and prevent the doughnuts from rising properly.
Importance of Dough Thickness for Texture
The thickness of your dough plays a significant role in the final texture of your doughnuts. A ½ inch thickness allows for an optimal rise during frying while ensuring a cooked interior. If the dough is too thick, the outside will fry quickly, leaving the inside undercooked. Conversely, too thin a dough may result in overly crispy doughnuts that lack the fluffy goodness you desire.
Second Rise: Preparing for Frying
After shaping, it’s time for the second rise. This step is critical for achieving fluffy doughnuts. Cover the shaped doughnuts with a cloth and let them rise in a warm area for about 30 to 45 minutes, or until they have puffed up again. This second rise allows the gluten to relax and the yeast to produce more gas, which will contribute to a light and airy texture.
The Role of the Second Rise in Achieving Fluffy Doughnuts
The second rise is not just a formality; it’s essential for developing the doughnut’s structure and texture. During this time, the doughnuts will expand, which helps create those desirable air pockets. If the doughnuts don’t rise enough before frying, they will be dense and heavy instead of light and fluffy.
Tips for Covering and Maintaining Warmth
To maintain warmth during the second rise, consider covering the doughnuts with a clean kitchen towel or plastic wrap to prevent them from drying out. If your kitchen is particularly cool, you can place them in an unheated oven with a bowl of hot water to create a humid environment that encourages rising.
Frying the Doughnuts
Now, you’re ready to fry! Heat a deep skillet or a deep fryer with oil to 350°F (175°C). Use a thermometer to ensure the oil is at the right temperature, as frying at too low a temperature can result in greasy doughnuts, while too high can lead to burnt exteriors and raw interiors.
Safety Tips for Frying at the Right Temperature
When frying, always be cautious. Use a deep-fry thermometer to monitor the oil temperature closely. Add only a few doughnuts at a time to prevent the temperature from dropping too much. It’s also wise to keep a splatter guard nearby for safety.
Key Indicators for Perfect Frying Time and Doneness
Fry the doughnuts for about 1 to 2 minutes on each side, or until they turn a beautiful golden brown. You’ll know they’re done when they puff up and the surface is golden. Use a slotted spoon to remove them from the oil, and let them drain on a paper towel-lined plate.
Decorating Your Valentine Doughnuts
The visual appeal of your doughnuts can elevate them from simple treats to show-stopping desserts, especially for Valentine’s Day.
Overview of Icing Options: Store-bought vs. Homemade
When it comes to decorating, you have choices: store-bought icing for convenience or homemade for a personal touch. A simple glaze made from powdered sugar, milk, and vanilla extract can complement your doughnuts beautifully without overwhelming them. You can also create a rich chocolate ganache or a cream cheese frosting for a decadent option.
Importance of Decoration in Enhancing Visual Appeal
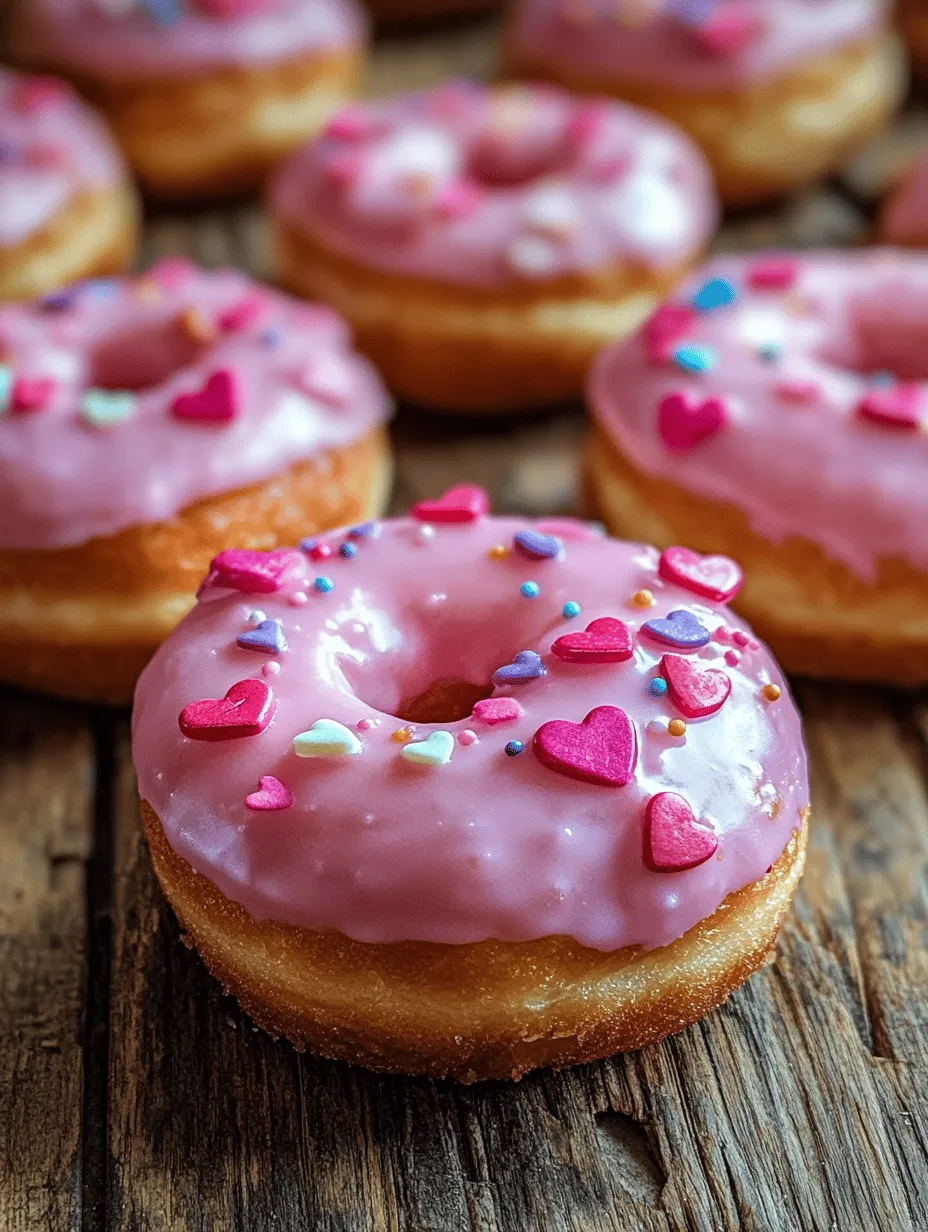
Decoration is not just about taste; it’s about creating a feast for the eyes. Vibrant colors and unique textures can make your doughnuts irresistible. Think about adding a pop of color with sprinkles or edible glitter, or drizzling contrasting icing over the top for an artistic flair.
Suggestions for Additional Toppings (e.g., Sprinkles, Edible Glitter)
Consider topping your doughnuts with fun and festive sprinkles, crushed nuts, or shredded coconut. Edible glitter can add a whimsical touch, perfect for Valentine’s celebrations. You might also want to incorporate seasonal flavors, like strawberry or raspberry jam filling, to enhance the romantic theme.
Serving Suggestions
Presenting your doughnuts can be just as fun as making them.
Ideas for Presenting Doughnuts on a Festive Platter
Arrange your doughnuts on a colorful platter or tiered cake stand to create an inviting display. You can also add fresh flowers or themed decorations around the platter to enhance the festive atmosphere. Wrapping them in clear cellophane bags tied with a ribbon makes for charming gifts.
Pairing Suggestions with Beverages (Coffee, Hot Chocolate)
Pair your doughnuts with coffee, hot chocolate, or even a sweetened tea for an indulgent treat. Consider creating a small tasting station with various beverages so guests can enjoy different combinations.
Creative Ways to Enjoy Doughnuts with Loved Ones
Encourage sharing by cutting the doughnuts into smaller pieces, allowing everyone to sample different flavors. Host a doughnut decorating contest or have a doughnut party where everyone can personalize their creations.
Nutritional Information and Serving Size
Understanding the nutritional content of your homemade treats can help you indulge mindfully.
Breakdown of Calories and Nutritional Content Per Doughnut
On average, each homemade doughnut contains approximately 200-250 calories, depending on the size and toppings used. This includes roughly 8 grams of fat, 30 grams of carbohydrates, and 2 grams of protein. Keep in mind that these values can vary based on your specific ingredients.
Discussion of Portion Sizes and Indulgence
While it’s easy to enjoy a few doughnuts, especially during festive occasions, moderation is key. Consider serving one doughnut per person, allowing for a taste without overindulgence. Keeping serving sizes reasonable ensures that everyone can enjoy a sweet treat while still feeling good afterward.
Conclusion
Making homemade Valentine doughnuts is not just about indulging in a delicious treat; it’s about the joy of sharing with loved ones. The process of creating soft, fluffy doughnuts filled with love can transform an ordinary day into a special celebration. Don’t hesitate to personalize this recipe to suit your tastes and preferences, whether that means experimenting with different flavors or adding unique decorations.
In every step of making these doughnuts, from the careful fermentation of the yeast to the delightful presentation, you’re creating warmth and love in the form of a delicious treat. This Valentine’s Day, give the gift of homemade doughnuts, and let the sweetness of your creations bring joy to those you cherish.