

Introduction
Welcome to the delightful world of Hawaiian Carrot Pineapple Cake, a dessert that brings together the sweet essence of tropical flavors and the comforting warmth of a homemade cake. This cake is a unique fusion of moist carrots and juicy pineapple, creating a perfect balance that tantalizes the taste buds. With its rich and creamy cream cheese frosting, this cake transforms any gathering into a celebration, making it a popular choice for birthdays, potlucks, and family get-togethers.
What sets the Hawaiian Carrot Pineapple Cake apart is not just its flavor; it’s also the ease of preparation. Even novice bakers can whip up this delightful treat from scratch, and the satisfaction of serving a homemade cake is unparalleled. Whether you’re looking for a comforting dessert to enjoy at home or something special to share with friends and family, this cake is sure to impress.
Understanding the Ingredients
Every great recipe begins with quality ingredients, and the Hawaiian Carrot Pineapple Cake is no exception. Each component plays a vital role in creating the cake’s moist texture, rich flavor, and delightful aroma. Let’s dive into the key ingredients that make this cake a standout.
All-Purpose Flour
At the foundation of our Hawaiian Carrot Pineapple Cake is all-purpose flour. This ingredient provides the necessary structure and stability that allows the cake to rise beautifully while maintaining a tender crumb. The gluten in the flour helps bind the ingredients together, creating a cake that is neither too dense nor too airy. For the best results, be sure to measure your flour accurately—using the scoop-and-level method is recommended to avoid compacting it.
Granulated Sugar
Granulated sugar is another essential ingredient that plays multiple roles in the cake. First and foremost, it contributes sweetness, balancing the natural flavors of the carrots and pineapple. Additionally, sugar helps retain moisture, ensuring that your cake remains soft and tender for days after baking. As the sugar dissolves during mixing, it also aids in creating a light texture, which is crucial for a cake that needs to rise well.
Baking Powder and Baking Soda
Leavening agents like baking powder and baking soda are critical for achieving the perfect rise in our cake. Baking powder is a combination of an acid and a base, which reacts with moisture and heat to create carbon dioxide bubbles, causing the cake to rise. On the other hand, baking soda requires an acidic component (in this case, the pineapple juice) to activate its leavening properties. Together, these agents ensure that your Hawaiian Carrot Pineapple Cake bakes up light and fluffy, rather than dense.
Ground Cinnamon and Salt
The addition of ground cinnamon brings a warm, aromatic flavor that complements the sweetness of the cake beautifully. Cinnamon not only enhances the overall flavor profile but also adds a hint of spice that makes each bite intriguing. A pinch of salt is equally important; it balances the sweetness and enhances the flavors of the other ingredients, creating a delicious harmony in every slice.
Eggs and Vegetable Oil
Eggs are a key ingredient in baking, providing moisture and acting as a binding agent that holds the cake together. They also contribute to the cake’s structure and richness. In this recipe, vegetable oil is used to keep the cake moist and tender. Unlike butter, which can solidify when cooled, oil maintains its liquid form, ensuring a consistently moist texture throughout your cake.
Carrots and Pineapple
The stars of the show, carrots, and pineapple, bring both flavor and moisture to the cake. Grated carrots add natural sweetness and are packed with vitamins and minerals, making this cake a slightly healthier dessert option. Pineapple, whether crushed or in tidbits, contributes juicy bursts of flavor and additional sweetness. Its acidity not only enhances the overall taste but also interacts with the baking soda, helping the cake rise beautifully.
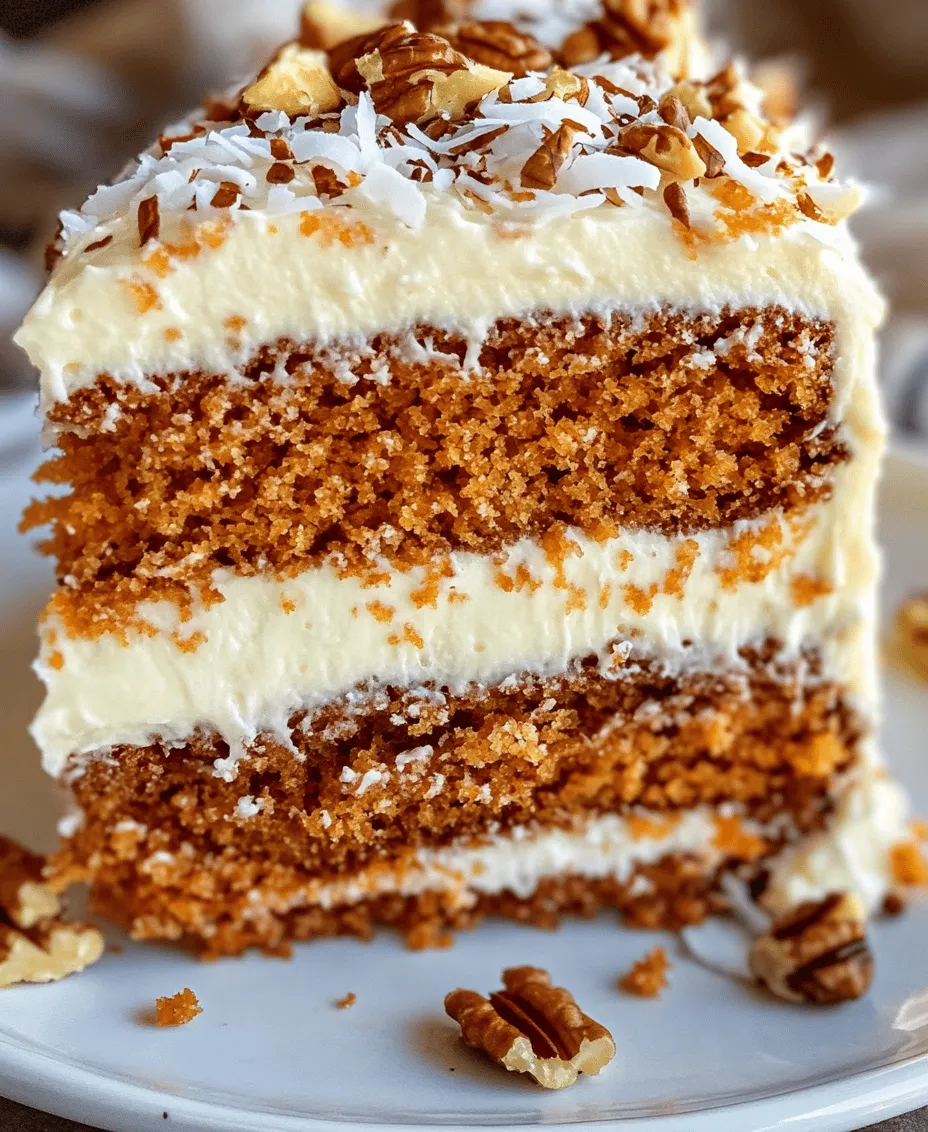
Nuts and Coconut
While optional, chopped nuts (such as walnuts or pecans) and shredded coconut can elevate your Hawaiian Carrot Pineapple Cake to new heights. Nuts add a delightful crunch and richness, while coconut contributes a tropical flavor that ties in beautifully with the overall theme of the cake. If you decide to include these ingredients, be sure to toast the nuts for an added depth of flavor.
Cream Cheese Frosting
No carrot cake would be complete without a rich cream cheese frosting. The creamy texture and tangy flavor of cream cheese perfectly complement the sweetness of the cake, creating a luscious topping that is hard to resist. Basic cream cheese frosting is made from cream cheese, butter, powdered sugar, and vanilla extract, and it can be adjusted to suit your taste. Whether you prefer it thick and sweet or light and tangy, this frosting is the crowning glory of your Hawaiian Carrot Pineapple Cake.
Step-by-Step Instructions
Now that we’ve explored the key ingredients, let’s dive into the step-by-step instructions for baking this delicious Hawaiian Carrot Pineapple Cake. Follow these detailed steps to ensure your cake turns out perfectly every time.
1. Preheat your oven: Begin by preheating your oven to 350°F (175°C). This ensures that your cake will bake evenly and rise properly.
2. Prepare your baking pans: Grease and flour two 9-inch round cake pans. Alternatively, you can line the bottoms with parchment paper for easier removal after baking.
3. Mix dry ingredients: In a large mixing bowl, combine the all-purpose flour, granulated sugar, baking powder, baking soda, ground cinnamon, and salt. Whisk these ingredients together until well combined, ensuring that there are no lumps.
4. Combine wet ingredients: In a separate bowl, beat the eggs and then add in the vegetable oil. Mix well until combined. You can also add the crushed pineapple at this stage, allowing the flavors to blend.
5. Incorporate the carrots: Grate fresh carrots until you have about 2 cups. Add the grated carrots to the wet ingredients, mixing well to ensure they are evenly distributed.
6. Combine wet and dry ingredients: Gradually add the wet mixture into the bowl with the dry ingredients. Stir gently until just combined—be careful not to overmix, as this can lead to a dense cake.
7. Add optional ingredients: If you’re using nuts or coconut, fold them into the batter at this point, ensuring they are evenly dispersed.
8. Fill the pans: Divide the batter evenly between the two prepared cake pans, smoothing the tops with a spatula.
9. Bake: Place the pans in the preheated oven and bake for 25-30 minutes, or until a toothpick inserted into the center comes out clean. Keep an eye on the cakes to prevent over-baking, as each oven can vary.
10. Cool the cakes: Once baked, remove the cakes from the oven and allow them to cool in the pans for about 10 minutes. Then, carefully transfer them to a wire rack to cool completely before frosting.
By following these steps, you’ll create a deliciously moist Hawaiian Carrot Pineapple Cake that is sure to impress anyone lucky enough to taste it. Stay tuned for the next part of this article, where we’ll dive into how to prepare the cream cheese frosting and assemble your cake for the perfect presentation.
Preheating and Preparing Pans
Before diving into the mixing and baking processes, it’s essential to preheat your oven to 350°F (175°C). Preheating the oven ensures that your Hawaiian Carrot Pineapple Cake bakes evenly from the moment it goes in. While the oven is warming up, prepare your cake pans. Greasing and lining the pans is crucial for preventing sticking and ensuring a smooth release after baking.
To prepare your pans, start by greasing them with butter or cooking spray. Then, cut parchment paper to fit the bottom of each pan. Place the parchment paper in the greased pans and lightly grease the top of the parchment as well. This step allows the cake to slide out effortlessly, maintaining its structure and appearance.
Mixing Dry Ingredients
With your pans prepared, it’s time to focus on the dry ingredients. In a large mixing bowl, combine all-purpose flour, baking powder, baking soda, ground cinnamon, and a pinch of salt. Sifting these dry ingredients together serves multiple purposes: it aerates the flour, breaks up any clumps, and ensures that the leavening agents are evenly distributed. Sifting also helps prevent any lumps from forming in your batter, resulting in a smoother texture.
To sift, use a fine-mesh sieve or a sifter. Hold it over your mixing bowl and gently tap it to allow the dry ingredients to fall through. If you notice any clumps in the flour, use a spatula to break them apart before sifting. This simple step can greatly enhance the final texture of your cake.
Combining Wet Ingredients
Next, shift your focus to the wet ingredients. In another large bowl, combine the granulated sugar, brown sugar, and unsweetened applesauce, which acts as a natural sweetener and moisture booster. Add in the eggs, one at a time, mixing thoroughly after each addition. It’s essential to beat the eggs well, as this will incorporate air into the batter, contributing to a light and fluffy cake.
After the eggs, mix in the crushed pineapple (with juice) and grated carrots. The pineapple not only adds flavor but also contributes to the cake’s moisture, while the carrots introduce a natural sweetness and texture. Use a whisk or an electric mixer on a low setting to combine these ingredients until they are just blended. Avoid overmixing, which can lead to a denser cake.
Creating the Batter
Now that the wet and dry ingredients are prepared, it’s time to create the batter. Gradually add the dry mixture to the wet ingredients, folding the two together with a spatula or wooden spoon. This gentle folding technique is crucial; overmixing at this stage can develop the gluten in the flour too much, leading to a tough cake.
To properly fold, scrape the spatula along the bottom of the bowl and bring the ingredients up over the top. Rotate the bowl as you fold to ensure even mixing. Stop mixing as soon as there are no visible streaks of flour; a few lumps in the batter are perfectly acceptable.
Baking the Cake
Once your batter is ready, carefully divide it evenly between the prepared cake pans. Smooth the tops with a spatula to ensure even baking. Place the pans in the preheated oven and bake for approximately 25-30 minutes. Keep an eye on the cakes during the last few minutes of baking. They are done when they spring back when lightly touched, and a toothpick inserted in the center comes out clean or with a few moist crumbs.
Using an oven thermometer can help ensure that your baking temperature is accurate. Every oven is a little different, so it’s essential to check for doneness rather than relying solely on time.
Cooling the Cakes
After removing the cakes from the oven, allow them to cool in the pans for about 10 minutes. This cooling time allows the cakes to firm up slightly, making them easier to remove. After 10 minutes, run a knife around the edges of the pans to loosen the cakes, and then invert them onto a wire rack to cool completely.
Cooling is a critical step before frosting. If you frost a warm cake, the frosting will melt and slide off, resulting in a messy presentation. Allow the cakes to cool completely for at least an hour before proceeding to the frosting stage.
Making the Cream Cheese Frosting
While the cakes cool, it’s the perfect time to prepare the cream cheese frosting. In a large mixing bowl, combine softened cream cheese and unsalted butter. Beat them together with an electric mixer until smooth and creamy. This step is vital for achieving a fluffy frosting.
Next, gradually add powdered sugar, mixing on low speed until incorporated. Once all the sugar is added, increase the mixer speed to medium and beat until the frosting is light and fluffy. Finally, mix in a splash of vanilla extract for added flavor. If the frosting is too thick, you can add a splash of milk to reach your desired consistency.
Frosting the Cake
Once your cakes are completely cooled and your frosting is ready, it’s time to assemble and frost your Hawaiian Carrot Pineapple Cake. Place one layer of the cake on a serving plate or cake stand. Spread a generous amount of frosting on top, using a spatula to create an even layer.
Carefully place the second layer on top, pressing down gently to adhere. Use the remaining frosting to cover the top and sides of the cake. To achieve a smooth finish, dip your spatula in hot water, wipe it dry, and then run it along the frosting.
Decorating Options
To add an extra touch to your Hawaiian Carrot Pineapple Cake, consider some creative decorating options. Shredded coconut can be sprinkled on top for a tropical flair, while crushed pineapple can be placed around the edges. Chopped nuts, such as walnuts or pecans, can also add texture and flavor.
For a more formal presentation, pipe decorative swirls of frosting around the top or bottom edges of the cake. Edible flowers or candied ginger can also make for stunning garnishes. The key is to be creative and have fun with the presentation!
Serving Suggestions
Hawaiian Carrot Pineapple Cake is delightful on its own, but pairing it with the right beverages can elevate the experience. A cup of freshly brewed coffee or a glass of iced tea complements the flavors beautifully. For a more festive occasion, consider serving it alongside a tropical punch or a refreshing fruit smoothie.
If you’re looking to create a dessert platter, slice the cake into generous pieces and serve it with a scoop of vanilla ice cream or a dollop of whipped cream. The cool creaminess contrasts wonderfully with the moist cake, making for a delightful treat.
Nutritional Information
When it comes to nutritional aspects, Hawaiian Carrot Pineapple Cake can be a delicious yet indulgent treat. While it contains wholesome ingredients like carrots and pineapple, it also includes sugars and fats from the frosting. A typical slice may contain approximately 320 calories, with about 15 grams of fat, 45 grams of carbohydrates, and 3 grams of protein.
However, this cake also provides essential vitamins and minerals from the carrots and pineapple. Carrots are high in beta-carotene, which is beneficial for eye health, while pineapple offers a good source of vitamin C. Moderation is key, so enjoy this cake as part of a balanced diet.
Conclusion
Baking the Hawaiian Carrot Pineapple Cake is not just about creating a delicious dessert; it’s about the joy of sharing moments with family and friends. This cake embodies the spirit of tropical flavors and is perfect for various occasions, from birthdays to casual gatherings.
As you bake, embrace the process and savor the aromas wafting through your kitchen. The satisfaction of pulling a beautifully baked cake from the oven and slathering it with creamy frosting is unparalleled. Whether you’re celebrating a special occasion or simply treating yourself, this cake is sure to leave a lasting impression. So gather your ingredients, preheat that oven, and get ready to create a delightful tropical masterpiece that will surely become a cherished recipe in your collection.