
Introduction
Chocolate cakes have long captured the hearts and taste buds of dessert lovers around the world. Their rich, indulgent flavor makes them a staple at birthday parties, weddings, and festive gatherings. However, one variation that stands out in the realm of chocolate desserts is the Heavenly Chocolate Coconut Cake. This delightful twist on a classic chocolate cake combines the bold flavors of chocolate with the tropical allure of coconut, creating a dessert that is as visually stunning as it is delicious.
This cake is not just an ordinary treat; it’s a celebration of flavors that perfectly complements various occasions, from casual family dinners to elegant celebrations. The Heavenly Chocolate Coconut Cake boasts a moist, tender crumb, enriched with the creamy goodness of coconut and the deep, intense flavor of cocoa powder. Whether you’re a devoted fan of chocolate, a lover of coconut, or simply seeking a crowd-pleasing dessert, this cake is sure to impress.
As we delve into this recipe, you’ll discover that the combination of chocolate and coconut creates a harmonious balance that appeals to both familiar and adventurous palates. The cake’s moist texture and rich flavor profile make it a standout choice for dessert lovers everywhere.
Understanding the Ingredients
Creating the Heavenly Chocolate Coconut Cake requires a careful selection of ingredients, each contributing to the cake’s distinct flavor and texture. Here’s a closer look at the key components that make this dessert a heavenly experience.
All-Purpose Flour
All-purpose flour serves as the backbone of our cake, providing the necessary structure to hold everything together. Its moderate protein content ensures that the cake rises beautifully while maintaining a tender crumb. For best results, be sure to measure the flour accurately, as too much can lead to a dense cake.
Cocoa Powder
Cocoa powder is, without a doubt, the heart of this chocolate cake. It infuses the batter with a rich chocolate flavor, ensuring that each bite is a decadent experience. When choosing cocoa powder, opt for high-quality Dutch-processed cocoa for a smoother and more intense flavor.
Coconut Milk
Coconut milk plays a dual role in this recipe. First, it adds moisture, resulting in a cake that is soft and luscious. Additionally, coconut milk imparts a subtle coconut flavor that complements the chocolate beautifully, creating a delightful fusion of tastes.
Shredded Coconut
Shredded coconut not only enhances the cake’s texture but also boosts its coconut flavor. When folded into the batter, the shredded coconut adds a delightful chewiness that contrasts wonderfully with the cake’s smoothness.
Unsalted Butter
Unsalted butter is essential for creating a creamy and rich frosting that perfectly tops our cake. It provides a luscious mouthfeel and depth of flavor. Using unsalted butter also allows you to control the saltiness of your cake and frosting, ensuring the perfect balance.
Ingredient Substitutions
While the ingredients listed above create the perfect Heavenly Chocolate Coconut Cake, there are options for those with dietary preferences. For a dairy-free cake, consider substituting coconut oil or vegan butter for the unsalted butter and using almond or soy milk in place of coconut milk. Additionally, gluten-free flour can be used to make the cake gluten-free, though adjustments in baking time may be necessary.
Preparing the Heavenly Chocolate Coconut Cake
Now that we’ve covered the essential ingredients, it’s time to roll up our sleeves and start preparing the cake batter. Follow this step-by-step guide to create a batter that’s sure to yield a deliciously moist cake.
Step 1: Mixing the Wet and Dry Ingredients
Begin by gathering your ingredients and preheating your oven to 350°F (175°C). Line two 9-inch round cake pans with parchment paper and grease the sides to ensure easy removal after baking.
In a large mixing bowl, combine the dry ingredients: all-purpose flour, cocoa powder, baking powder, baking soda, and salt. Whisk these together until evenly mixed. In a separate bowl, whisk together the wet ingredients, including coconut milk, unsalted butter (melted), eggs, and vanilla extract. Mixing wet and dry ingredients separately is crucial as it ensures that the leavening agents are evenly distributed throughout the flour, leading to a well-risen cake.
Step 2: Achieving the Perfect Batter Consistency
Once the wet and dry mixtures are prepared, it’s time to combine them. Pour the wet ingredients into the bowl of dry ingredients. With a spatula, gently fold the mixture together until just combined—be careful not to overmix! Overmixing can lead to a tough cake, which we want to avoid.
Step 3: Folding in Shredded Coconut
Now comes the fun part—folding in the shredded coconut. This step is essential, as it enhances the cake’s texture and provides delightful bursts of coconut flavor throughout the cake. Use a gentle folding motion to incorporate the shredded coconut into the batter without deflating it.
Step 4: The Role of Boiling Water
One unique aspect of this recipe is the addition of boiling water. After you’ve mixed in the shredded coconut, carefully stir in one cup of boiling water. This not only helps to hydrate the cocoa powder, intensifying the chocolate flavor, but it also contributes to the cake’s moisture and rich texture. The batter will be quite thin, but don’t worry; this is exactly what you want!
Baking the Cake
With the batter prepared, it’s time to pour it into the cake pans. Divide the batter evenly between the two prepared pans, smoothing the tops with a spatula.
Preheating and Preparing the Cake Pans
Ensure that your oven is fully preheated to 350°F (175°C) before placing the cakes inside. Proper preheating is critical to achieving the desired rise and texture. Bake the cakes for about 30 to 35 minutes, or until a toothpick inserted into the center comes out clean or with a few moist crumbs attached.
Once baked, remove the cake pans from the oven and let them cool in the pans for about 10 minutes. Then, carefully invert them onto a wire rack to cool completely. Allowing the cakes to cool completely is essential, especially if you plan to frost them.
Stay tuned for the next part where we will dive into the delicious frosting and assembling the Heavenly Chocolate Coconut Cake!
Baking Temperature and Time
Baking your Heavenly Chocolate Coconut Cake to perfection requires attention to detail, particularly in terms of temperature and time. Preheat your oven to 350°F (175°C), ensuring it reaches the proper temperature before placing your cake pans inside. This creates an optimal environment for even baking and helps your cakes rise beautifully.
Once the cakes are in the oven, allow them to bake for about 25 to 30 minutes. To check for doneness, insert a toothpick into the center of the cakes. If it comes out clean or with a few moist crumbs clinging to it, your cakes are ready. Avoid overbaking, which can lead to a dry texture—remember, your goal is a moist, tender crumb.
Importance of Cooling the Cakes Properly Before Frosting
After baking, it’s crucial to cool your cakes properly before frosting. Allow them to cool in the pans for about 10-15 minutes. This helps them set and makes them easier to remove. Then, turn them out onto a wire rack to cool completely. Frosting a warm cake can lead to melted frosting and an unappealing mess. Proper cooling not only ensures a better appearance but also enhances the flavors as the cake settles.
Crafting the Chocolate Coconut Frosting
Now that your cakes are cooled, it’s time to create the luscious chocolate coconut frosting that will take your cake to another level of indulgence.
Step-by-Step Instructions for Making the Frosting
1. Ingredients: Gather the following ingredients:
– 1 cup unsalted butter, softened to room temperature
– 4 cups powdered sugar
– ½ cup unsweetened cocoa powder
– 1/4 cup milk (or coconut milk for added flavor)
– 1 teaspoon vanilla extract
– 1 cup shredded coconut (sweetened or unsweetened based on preference)
2. Softening Butter: Begin by ensuring your butter is softened to room temperature. This step is crucial for achieving a creamy and smooth frosting. If you forget to take your butter out in advance, you can cut it into small cubes and let it sit at room temperature for about 10-15 minutes.
3. Mixing: In a large mixing bowl, beat the softened butter with an electric mixer on medium speed until it is light and fluffy, about 2-3 minutes. Gradually add the powdered sugar and cocoa powder, alternating with the milk, mixing on low speed until fully incorporated. This method helps prevent a cloud of sugar from escaping into your kitchen.
4. Incorporating Coconut: Once the mixture is smooth and creamy, fold in the shredded coconut. This addition not only enhances the texture but also infuses the frosting with delightful coconut flavor.
5. Final Whipping: Mix on medium-high speed for another 1-2 minutes until the frosting is fluffy and well-combined. Taste the frosting and adjust the sweetness if necessary by adding more powdered sugar.
Assembling the Cake
Now that you have your cakes and frosting ready, it’s time to assemble the Heavenly Chocolate Coconut Cake.
Detailed Instructions for Layering and Frosting
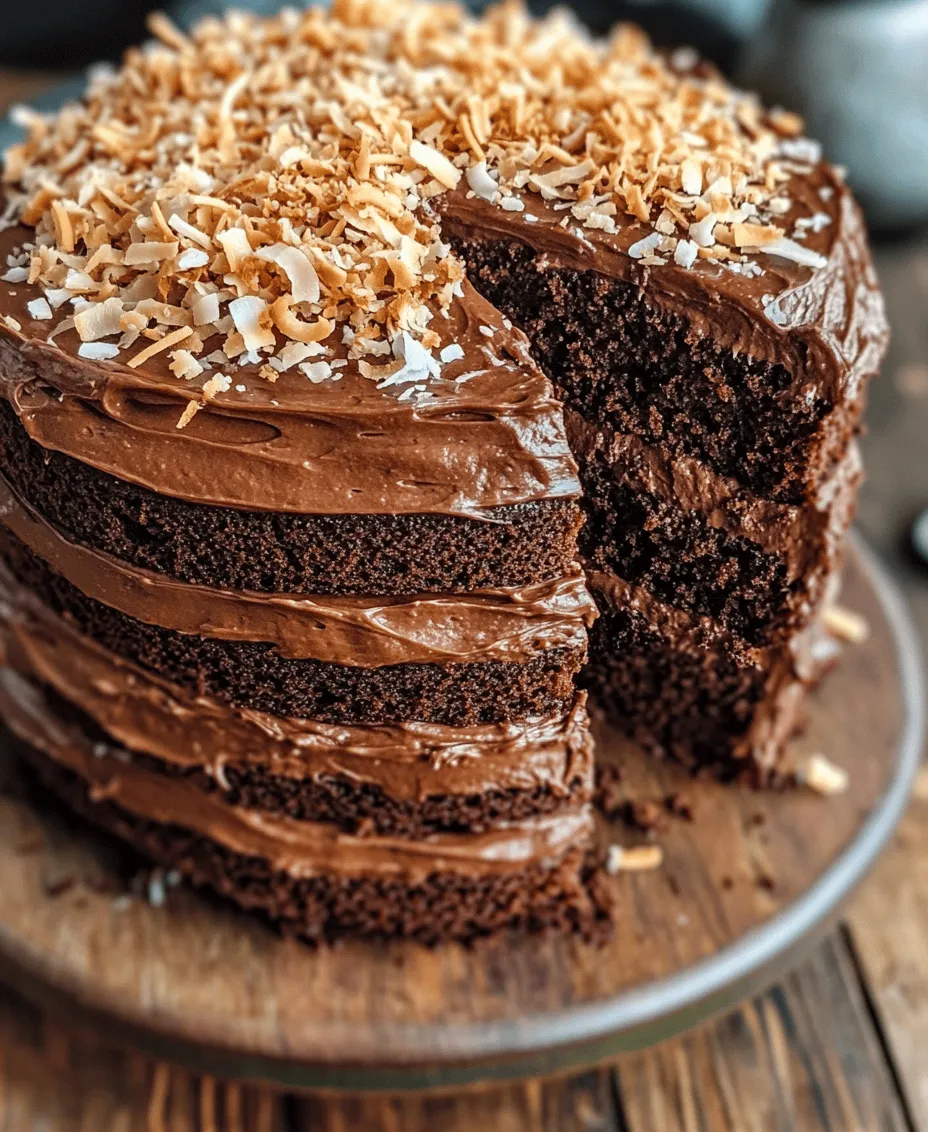
1. Layering: Place one layer of the cooled chocolate cake on a serving plate or a cake stand. Using an offset spatula, spread a generous layer of frosting over the top of the first cake layer.
2. Adding the Second Layer: Gently place the second layer on top of the frosted first layer. Press down lightly to create an even base for the frosting.
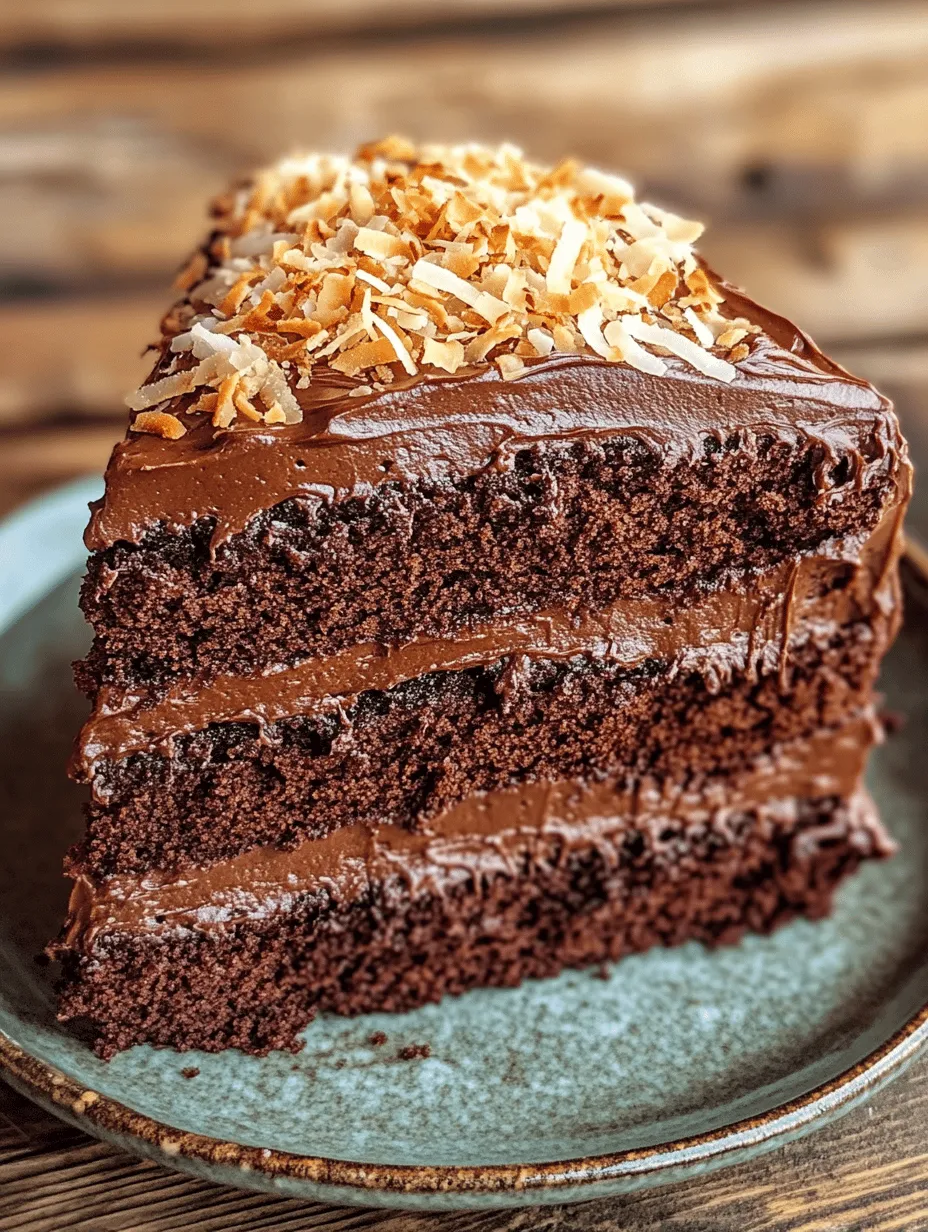
3. Frosting the Sides and Top: Use the remaining frosting to cover the top and sides of the cake. Start by applying a “crumb coat,” which is a thin layer of frosting that seals in crumbs. Chill the cake in the refrigerator for about 20-30 minutes to set this layer. After the crumb coat is set, apply a thicker layer of frosting to achieve a beautiful finish.
Tips for Achieving a Smooth Finish
– Use a bench scraper or offset spatula to smooth out the frosting on the sides and top of the cake.
– For a rustic look, consider swirling the frosting with the spatula for visual interest.
– If your frosting is too thick, add a little more milk until you reach your desired consistency.
Creative Decoration Ideas
– Chocolate Shavings: Create chocolate shavings using a vegetable peeler on a bar of chocolate and sprinkle them over the top.
– Coconut Flakes: Toast some shredded coconut in a dry skillet until golden brown and sprinkle it atop the cake for added flavor and crunch.
– Fresh Berries: Decorate with fresh berries like raspberries or strawberries to add a pop of color and freshness.
Serving Suggestions
Your Heavenly Chocolate Coconut Cake is perfect for a variety of occasions. Here’s how to make the most of it:
Ideal Occasions for Serving
This cake is a delightful centerpiece for birthday parties, holiday gatherings, and special celebrations. Its rich flavor and beautiful appearance make it a showstopper.
Pairing Suggestions
Pair your cake with a refreshing beverage, such as a cold glass of milk, coconut milk, or even a cup of rich coffee. The chocolate flavor complements coffee beautifully, while coconut milk enhances the tropical notes of the cake.
Presentation Tips
For an impressive display, consider using a tiered cake stand or a decorative platter. Add a few sprigs of mint or edible flowers around the base to elevate the presentation further.
Storage and Preservation
To ensure your Heavenly Chocolate Coconut Cake remains fresh and delicious, follow these storage tips:
Best Practices for Storing the Cake
– Room Temperature: If you plan to consume the cake within a couple of days, you can leave it covered at room temperature. Use a cake dome or wrap it in plastic wrap to keep it moist.
– Refrigeration: For longer storage, keep the cake in the refrigerator. This will maintain freshness for up to a week.
Tips on Freezing the Cake
If you want to enjoy your cake later, freezing is an excellent option. Follow these steps:
1. Allow the cake to cool completely and wrap it tightly in plastic wrap.
2. For added protection, wrap it in aluminum foil or place it in an airtight container.
How to Properly Thaw and Serve if Frozen
When you’re ready to enjoy your frozen cake, remove it from the freezer and place it in the refrigerator for several hours or overnight to thaw. Once thawed, bring it to room temperature before serving for the best texture and flavor.
Conclusion
The Heavenly Chocolate Coconut Cake is a stunning dessert that combines rich chocolate with the tropical flavors of coconut, creating a delightful treat that appeals to a wide audience. Whether for a special occasion or just a sweet indulgence, this cake is sure to impress.
We encourage you to try this recipe and experience the wonderful combination of flavors and textures for yourself. The joy of baking and sharing homemade treats with loved ones is an experience like no other. So gather your ingredients, get baking, and create lasting memories with this delectable cake!