
Introduction
Strawberry Shortcake Layer Cake is a timeless dessert that evokes feelings of warmth and nostalgia. This classic treat is a staple at celebrations, gatherings, and summer picnics, delighting everyone with its vibrant flavors and beautiful presentation. The combination of soft sponge cake, fresh strawberries, and fluffy whipped cream creates an indulgent experience that tantalizes the taste buds. This cake not only satisfies a sweet tooth but also brings a sense of joy and celebration to any table.
The roots of strawberry shortcake can be traced back to the 19th century, where it emerged as a popular dessert in the United States. Traditionally, it consisted of a simple biscuit base layered with strawberries and cream. Over the years, the recipe has evolved, leading to variations like the Strawberry Shortcake Layer Cake, which incorporates multiple layers of cake, making it even more impressive for special occasions. Whether it’s a birthday, anniversary, or a summer barbecue, this cake stands as a centerpiece, drawing everyone in with its inviting appearance and delightful aroma.
Understanding the Components of Strawberry Shortcake Layer Cake
To truly appreciate the Strawberry Shortcake Layer Cake, it’s essential to understand the components that make it so special. Each element plays a vital role, contributing to the overall flavor and texture of the dessert.
The Sponge Cake
At the heart of this layered delight is the sponge cake, which serves as the canvas for the strawberries and whipped cream. A good sponge cake is light, airy, and tender, providing the perfect balance to the juicy strawberries. The texture of the cake should complement the softness of the cream and the freshness of the fruit, creating a harmonious bite. The sponge itself is made using a combination of all-purpose flour, sugar, butter, and eggs, which together create a structure that holds up well to layering and frosting.
Fresh Strawberries
The star of the show, fresh strawberries, are what elevate this dessert from ordinary to extraordinary. Their sweet and tangy flavor brings brightness to the layers, while their vibrant color enhances the visual appeal. When selecting strawberries, look for ripe, juicy berries that are deep red in color, as they will provide the best taste. Additionally, the process of macerating the strawberries helps to enhance their natural sweetness and allows the juices to seep out, creating a syrup that adds moisture to the cake.
Whipped Cream Frosting
Topping off the layers is the whipped cream frosting, which lightens the overall dessert. This fluffy concoction is made from heavy whipping cream, which, when whipped to perfection, transforms into a stable frosting that can hold its shape. The addition of powdered sugar ensures just the right amount of sweetness without overpowering the fresh strawberries. The whipped cream not only adds a creamy texture but also serves as an ideal contrast to the sponge cake and strawberries, making each bite a delightful experience.
Gathering Ingredients for Success
Creating the perfect Strawberry Shortcake Layer Cake begins with gathering the right ingredients. Each one plays a significant role in achieving the desired flavor and texture.
Sponge Cake Ingredients
– All-purpose flour: This is the backbone of the sponge cake, providing structure and stability. It’s essential to use the right amount of flour to ensure the cake rises properly while remaining tender.
– Sugar: Not only does sugar sweeten the cake, but it also tenderizes the crumb and helps with moisture retention. Granulated sugar is typically used in the sponge cake recipe.
– Butter: For richness and flavor, butter is a crucial ingredient. It adds moisture to the cake and contributes to its tender texture. Be sure to use unsalted butter for better control over the cake’s sweetness.
– Eggs: Eggs are essential for binding the ingredients together and providing leavening. They help the cake rise and contribute to its overall structure. Room temperature eggs are preferred for better incorporation.
– Optional ingredients: For an added layer of flavor, consider incorporating lemon zest into the sponge cake batter. This subtle citrus note enhances the overall taste, complementing the strawberries beautifully.
Strawberry Filling Ingredients
– Fresh strawberries: The key ingredient for filling, fresh strawberries should be ripe and flavorful. They are typically sliced or quartered to make them easy to layer between the cake.
– Sugar: A small amount of sugar is used to macerate the strawberries, drawing out their juices and enhancing their natural sweetness. This process creates a syrup that will soak into the cake layers.
– Lemon juice: A splash of lemon juice not only brightens the flavor of the strawberries but also balances their sweetness. It helps to create a refreshing contrast in the dessert.
Whipped Cream Frosting Ingredients
– Heavy whipping cream: This is the base for the whipped cream frosting. High-fat content cream is essential to achieve the right texture and stability when whipped.
– Powdered sugar: Used to sweeten the whipped cream, powdered sugar dissolves easily and contributes to a smooth texture. It also helps stabilize the frosting, allowing it to hold its shape when piped or spread.
Step-by-Step Instructions for Making Strawberry Shortcake Layer Cake
Preparing the Strawberries
Before diving into the cake-making process, it’s important to prepare the strawberries. This step is essential for maximizing their flavor and ensuring they are ready to layer between the cake.
1. Select the Strawberries: Begin by selecting ripe, fresh strawberries. Look for berries that are deep red and firm, avoiding any that show signs of bruising or mold.
2. Wash the Strawberries: Gently wash the strawberries under cool running water to remove any dirt or pesticides. Pat them dry with a clean towel.
3. Hull the Strawberries: Use a paring knife or a strawberry huller to remove the green tops and the white core of the strawberries. This will expose the sweet, red flesh that will be used in the filling.
4. Slice the Strawberries: Depending on your preference and the size of the strawberries, slice them into halves or quarters. This will make them easier to layer in the cake.
5. Macerate the Strawberries: In a medium bowl, combine the sliced strawberries with a couple of tablespoons of sugar and a splash of lemon juice. Toss them gently to coat, ensuring that all the pieces are covered. Allow the strawberries to sit for about 15-20 minutes at room temperature. This process, known as maceration, will draw out the juices from the strawberries, creating a flavorful syrup that adds sweetness and moisture to the cake.
After the strawberries are sufficiently macerated, you can move on to the next step in creating your Strawberry Shortcake Layer Cake. The sweetness of the strawberries combined with the sponge cake’s lightness and the whipped cream’s creaminess will result in a delightful dessert that is sure to impress.
Stay tuned as we continue with the step-by-step process of making the sponge cake, assembling the layers, and finishing with the whipped cream frosting in the following sections of the recipe.
Importance of Timing in Flavor Development
When it comes to baking a Strawberry Shortcake Layer Cake, timing is crucial not just for the baking process but also for flavor development. Allowing the sponge cake to cool completely before assembling ensures that the flavors meld beautifully. The strawberries, once sliced and allowed to sit with sugar, develop a syrupy essence that enhances their natural sweetness. This careful timing means that when you finally take that first bite, you’ll experience a harmonious blend of flavors that make this cake a true delight.
Making the Sponge Cake
Preheating the Oven and Preparing the Cake Pans
Begin by preheating your oven to 350°F (175°C). This temperature is ideal for baking sponge cakes, as it allows for a light rise and a tender crumb. While your oven is heating, prepare your cake pans. You’ll need three 9-inch round cake pans for this recipe. Grease each pan thoroughly with butter or cooking spray and line the bottoms with parchment paper to prevent sticking. This step is essential for ensuring that your cakes release easily once baked.
Mixing Dry Ingredients and Creaming Butter and Sugar
In a separate mixing bowl, sift together 2 cups of all-purpose flour, 1 ½ teaspoons of baking powder, and ½ teaspoon of salt. Sifting these ingredients helps eliminate lumps and aerates the flour, contributing to a lighter cake texture. Set this bowl aside.
In a large mixing bowl, cream together ¾ cup of unsalted butter and 1 ½ cups of granulated sugar. Use an electric mixer on medium speed for about 3-5 minutes until the mixture is light and fluffy. This step is crucial as it incorporates air into the batter, which will help the cake rise beautifully.
Once the butter and sugar are well combined, add 3 large eggs, one at a time, mixing well after each addition. Follow this by adding 1 teaspoon of pure vanilla extract, which will enhance the overall flavor of your cake. After the eggs and vanilla are fully incorporated, it’s time to gradually add the dry ingredients. Alternate between adding the dry mixture and ½ cup of milk, starting and finishing with the dry ingredients. This method ensures that the batter maintains a smooth consistency without overmixing, which can lead to a dense cake.
Proper Mixing Techniques and Baking Times
When mixing, be careful not to overwork the batter. Mix just until combined; a few small lumps are perfectly fine. Overmixing can result in a tough sponge. Pour the batter evenly into the prepared cake pans and smooth the tops with a spatula. Bake the cakes in your preheated oven for 25-30 minutes, or until a toothpick inserted into the center comes out clean. Keep an eye on the cakes during the last few minutes of baking to avoid overbaking, which can dry them out.
Once baked, remove the pans from the oven and let them cool in the pans for about 10 minutes before transferring the cakes to a wire rack to cool completely. This cooling process is vital for flavor development, as the cakes continue to set and develop their taste.
Preparing Whipped Cream Frosting
Achieving the Perfect Whipped Cream Consistency
While your cakes are cooling, it’s time to prepare the whipped cream frosting. Start with 2 cups of heavy whipping cream, which should be chilled for optimal whipping. Using a chilled mixing bowl and beaters can help achieve a better consistency. Beat the cream on medium-high speed until it begins to thicken.
Incorporating Sugar and Vanilla Effectively
Once the cream starts to thicken, gradually add ½ cup of powdered sugar and 1 teaspoon of pure vanilla extract. Continue whipping until you reach stiff peaks. Be careful not to over-whip the cream, as it can turn grainy and eventually become butter. The whipped cream should be fluffy and hold its shape, perfect for layering and frosting your cake.
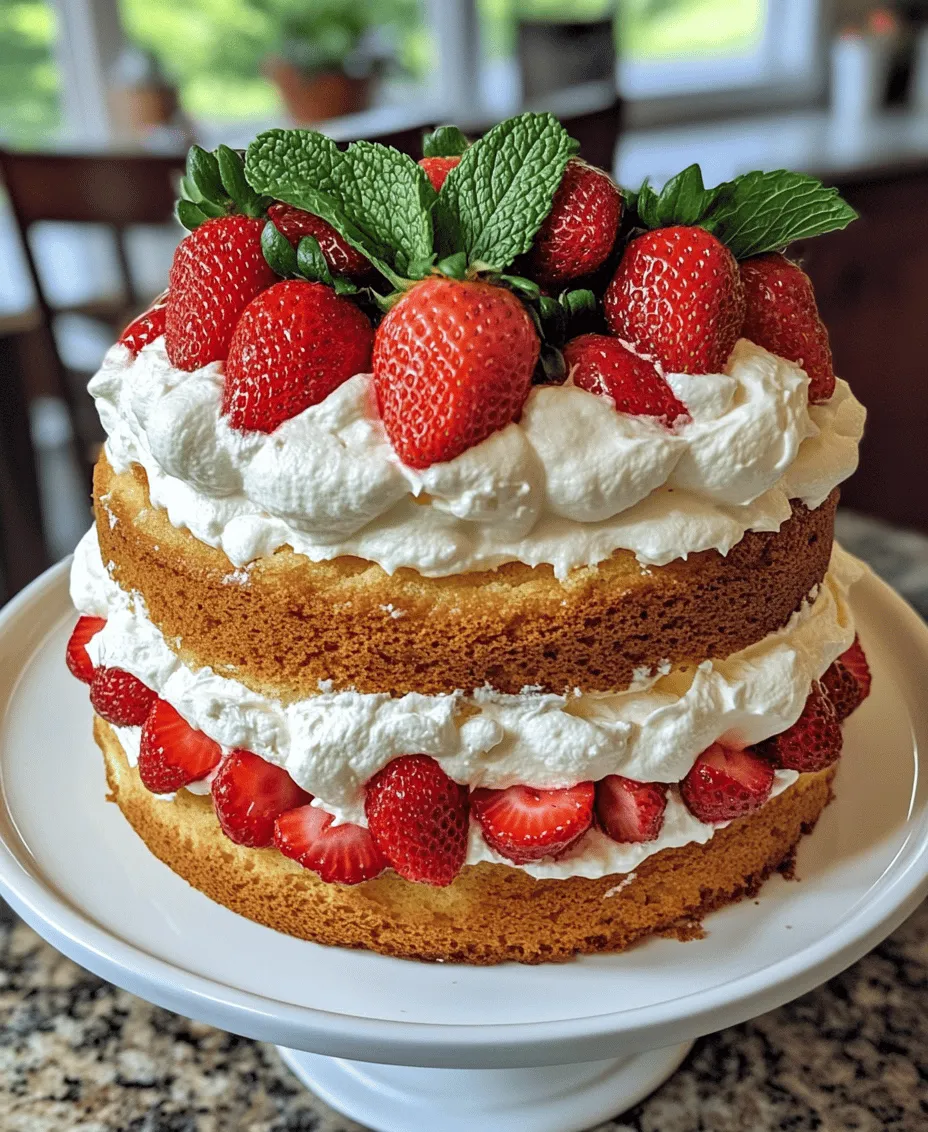
Assembling the Cake
Layering Process for Optimal Flavor Distribution
Now that your cakes are cool and your frosting is ready, it’s time to assemble the layers. Start by placing one layer of cake on a serving platter or cake stand. Spread a generous layer of whipped cream frosting over the top of the first layer. Then, take 1 cup of fresh strawberries, hulled and sliced, and spread them evenly over the whipped cream. This combination of strawberries and cream is what gives the cake its signature flavor.
Add the second layer of cake on top and repeat the process: frosting, followed by another layer of strawberries. Finally, place the third layer of cake on top.
Importance of Cooling the Cakes Completely Before Assembly
It’s essential to ensure that each layer is completely cooled before assembly. If the cake layers are warm, the whipped cream can melt, resulting in a messy assembly and a less stable cake. Once assembled, you can frost the top and sides of the cake with the remaining whipped cream.
Frosting the Cake
Applying Whipped Cream for a Clean Finish
When frosting the cake, use a large offset spatula to spread the whipped cream evenly. Start by applying a thin layer of whipped cream to the sides and top, known as a crumb coat. This layer will seal in any loose crumbs and provide a base for the final frosting layer. Once the crumb coat is applied, chill the cake for about 30 minutes to set the frosting.
After chilling, apply a thicker layer of whipped cream to the cake, smoothing it out for a clean finish. Ensure that the sides are well covered, and the top is evenly frosted.
Tips for Achieving a Smooth Appearance
For a polished look, dip your spatula in warm water before smoothing the frosting. This will help create a clean finish without dragging the cake layers or creating crumbs in the frosting.
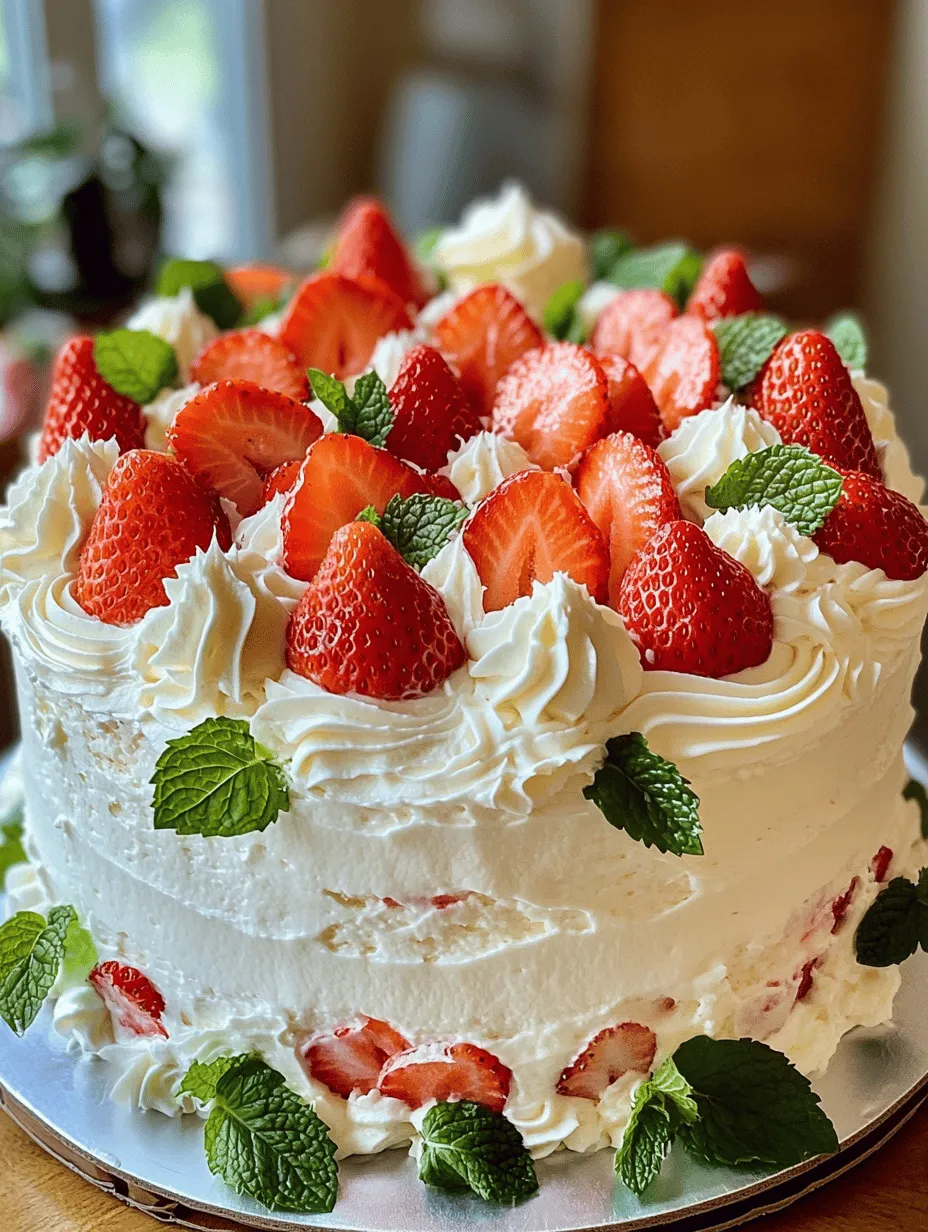
Garnishing the Cake
Decorative Elements Using Whole Strawberries and Mint Leaves
Once frosted, it’s time to add some flair to your Strawberry Shortcake Layer Cake. Use whole strawberries to decorate the top of the cake, arranging them in a circle or in the center for an eye-catching display. For a touch of color and freshness, add a few sprigs of mint leaves around the strawberries. This not only enhances the visual appeal but also adds a subtle flavor.
Importance of Chilling the Cake Before Serving
To allow the flavors to meld together beautifully, it’s recommended to chill the cake for at least an hour before serving. This step enhances the overall taste and ensures that the whipped cream frosting holds its shape when sliced.
Serving Suggestions and Pairings
Ideas for Serving the Cake for Different Occasions
The Strawberry Shortcake Layer Cake is perfect for a variety of occasions, from birthday celebrations to summer picnics and elegant afternoon teas. For a casual gathering, serve the cake with a side of fresh strawberries or a scoop of vanilla ice cream. For more formal events, consider adding a drizzle of strawberry sauce or a dusting of powdered sugar for an elegant finish.
Beverage Pairings
Pair your cake with beverages that complement its flavors. A cup of freshly brewed tea or coffee pairs beautifully with the sweet and creamy layers. For a more festive touch, consider serving it with a glass of sparkling wine or champagne, which adds a celebratory note to the occasion.
Customizing the Cake for Different Dietary Preferences
This delightful cake can also be customized to suit various dietary preferences. For those seeking gluten-free options, substitute the all-purpose flour with a gluten-free blend. Additionally, you can use coconut cream instead of whipped cream for a dairy-free alternative. The versatility of this recipe allows you to create a cake that caters to different tastes and dietary needs.
Conclusion
The joy of making a Strawberry Shortcake Layer Cake extends beyond simply baking; it’s about celebrating the delightful combination of flavors and textures that this dessert brings to the table. From the light and airy sponge cake to the luscious whipped cream and fresh strawberries, each layer contributes to a delicious experience.
Encourage your friends and family to gather around the table to savor each bite, creating memories that will last long after the cake is gone. Whether for a special occasion or just because, this Strawberry Shortcake Layer Cake is a testament to the beauty of baking and the simple pleasures of life. Embrace the process, enjoy the flavors, and indulge in the sweet satisfaction that comes from creating something truly special.